
TL:DR
- Set up the essentials first: Apple's setup assistant guides you through data transfer, Apple Account sign-in, Face ID/Touch ID, and a software update.
- Make it yours: set a wallpaper, tailor Control Center, add widgets, and set up automations.
- Add a few versatile apps: Goodnotes, YouTube, Procreate, Libby, and GeoGuessr.
- Get more out of it: grab a stylus, learn key gestures, protect the screen, and keep your battery between 20-80%.
New iPad in hand? Congrats! Whether you bought it for work, study, drawing, reading, entertainment, or a mix of all five, you’re likely thinking: “Where do I start?”
Turning a new iPad into your iPad is part of the fun, and in this guide we show you exactly where to start your setup. From transferring your data to sorting out security and privacy, there are a couple of key boxes to tick.
Then, there’s the fun stuff: personalizing your iPad, connecting accessories, and finding the best apps for using your new iPad for work, study, and entertainment.
New iPad setup checklist: The initial steps
Need to set up your iPad from scratch? Start here. If you’re already up and running, skip to the next section for ways to personalize it.
The good news is that Apple's setup assistant will do most of the prompting, but you’ll still need to make a few decisions along the way. You’ll choose how to bring over your data, connect your Apple Account, secure the device, and tweak the Apple services and privacy settings you need.
So, what to do when you get a new iPad? Start here:
- Unbox and power up: Press and hold the top power button until the Apple logo appears. If your iPad doesn’t turn on, connect it to power and let it charge for a while first—to at least 50% charge. Once the ‘Hello’ screen appears, follow the prompts to choose your language and region.
- Use Quick Start or set up manually: If you already have an iPhone or iPad, keep that previous device nearby and use Quick Start. With Wi-Fi and Bluetooth, your existing device can help transfer your settings, sign you in, and transfer your apps and data. If this is your first Apple device, or you’d prefer to start with a blank slate, choose Set Up Without Another Device and continue setting up manually.
- Connect to Wi-Fi and activate your iPad: Choose a Wi-Fi network and enter the password so your iPad can connect to Apple’s activation servers. If you have a cellular service iPad, you may also be prompted to activate your cellular network or set up an eSIM.
- Set up Face ID, Touch ID, and a passcode: Depending on your iPad model, Apple might ask you to set up Face ID or Touch ID. You’ll also create a password to help protect your device. Apple typically offers a six-digit passcode, but you can tap Passcode Options if you prefer a four-digit passcode or custom passcode.
- Sign in to your Apple Account: Your Apple Account connects your iPad to iCloud and the App Store, giving you access to previous purchases associated with your account. Using the same account across your Apple products also lets you sync the iCloud data you choose, including saved passwords through iCloud Keychain.
- Choose your basic settings: Apple will walk you through options such as Siri, Screen Time, analytics, location services, automatic updates, and appearance. Take a moment to read these. You can change most of them later in Settings.
- Check for an iPadOS update: Once you reach the Home Screen, go to Settings > General > Software Update and check whether a new version of iPadOS is available. Starting with the latest software gives you Apple’s current features, security updates, and bug fixes before you set up everything else. You can also update Accessibility Settings by hitting the blue accessibility button. For example, audio description.
If you’ve got an iPad mini (A17 Pro) or an iPad with an M1 chip or later, you can opt to turn on Apple Intelligence in Settings > Apple Intelligence & Siri to use Writing Tools, Genmoji, Image Playground, and more. Apple Intelligence needs about 7 GB of device storage, and your device and Siri languages need to be set to the same supported language
Once these basics are sorted, the iPad setup process becomes a lot more exciting. Now it's time to add some of your own character and charm, from the Home Screen to the apps you’ll use every day.
How to personalize a new iPad
When you’re setting up a new iPad, there are no rules. Go minimal, go colorful, cover the Home Screen in widgets, or keep everything tucked away.
Set your background
Start with the wallpaper. You can choose from Apple’s built-in options or use a photo from your library. Once you’ve picked the wallpaper, you can decide whether to use it across the Lock Screen and Home Screen or give each screen a different look.
If you choose a photo, you can reposition it and adjust how it appears before saving it. For the Home Screen, you can also blur the wallpaper if you want your apps and widgets to stand out clearly.
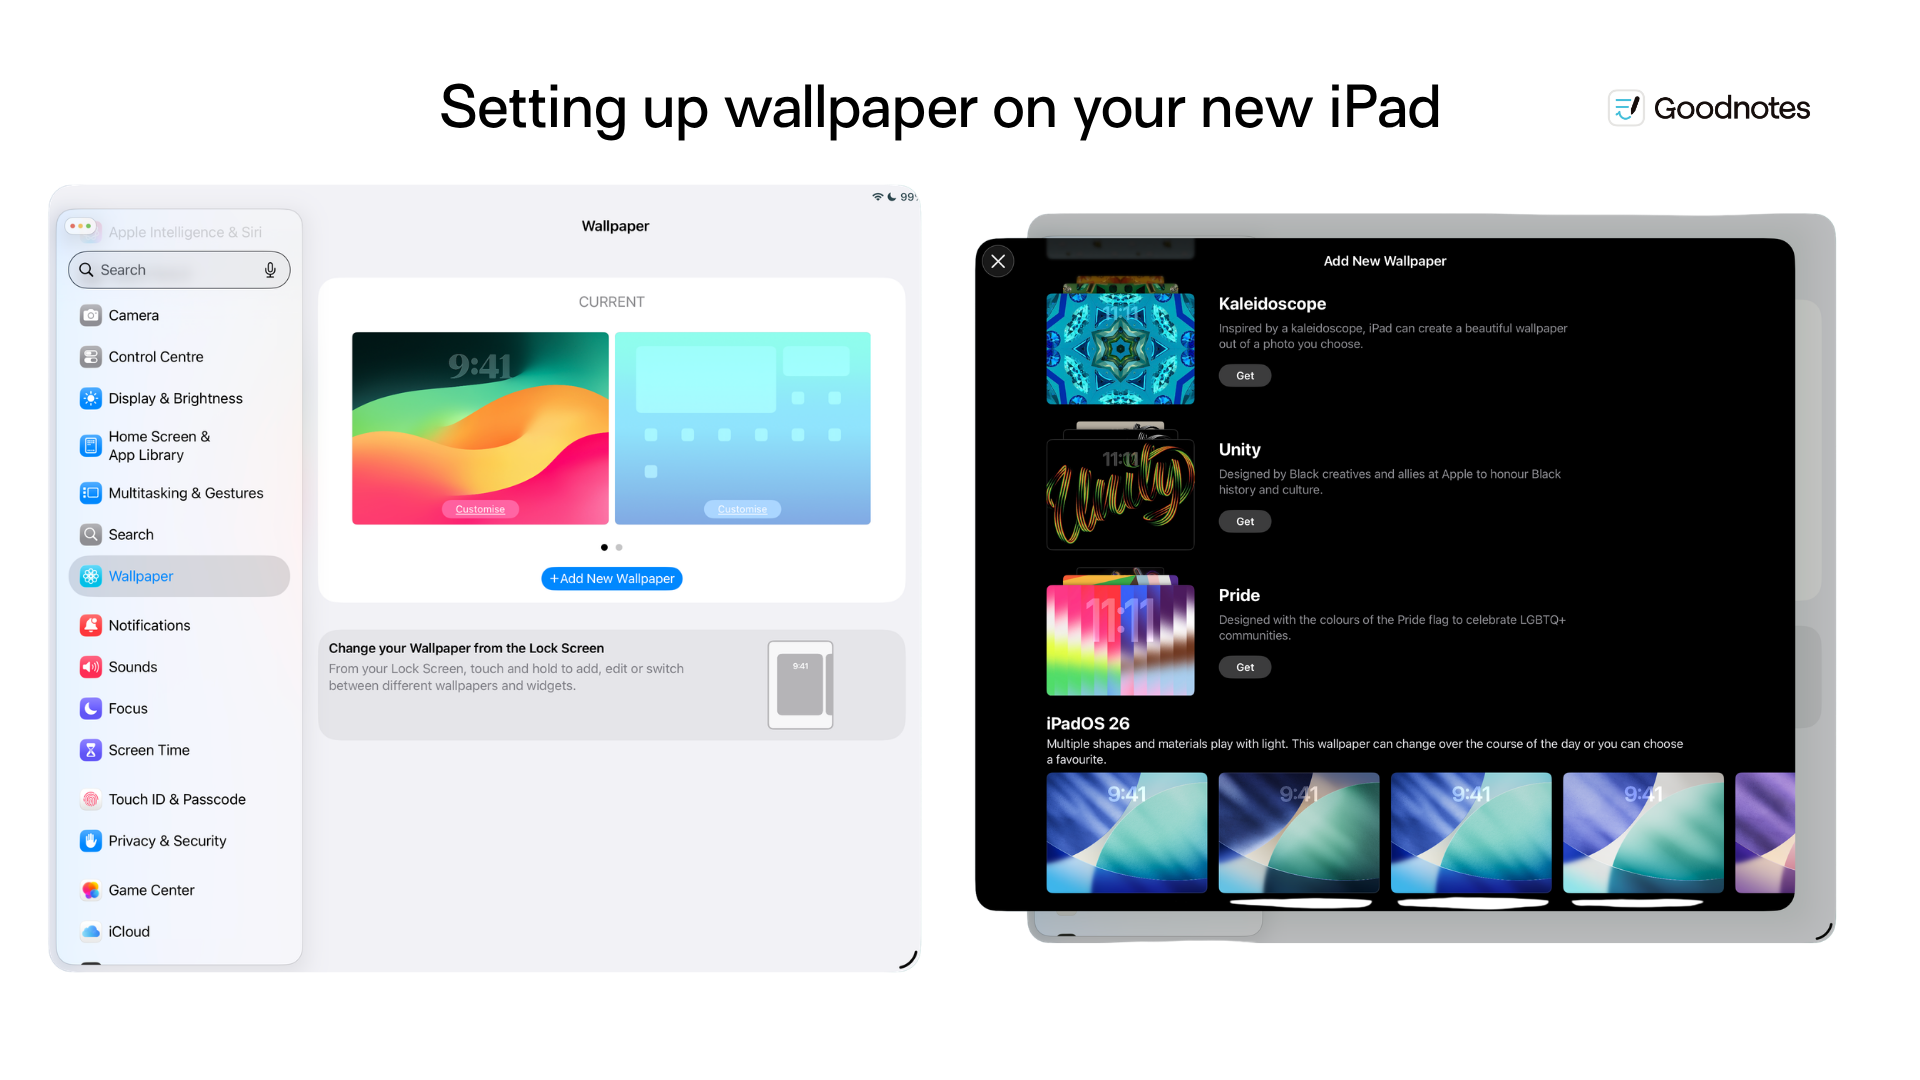
To set your wallpaper:
- Open Settings > Wallpaper
- Tap Add New Wallpaper
- Choose one of Apple’s wallpaper options or select a photo from your library
- Adjust the image until it sits the way you want
- Tap Add when you’re happy with it
- Choose Set as Wallpaper Pair to use the wallpaper on both your Lock Screen and Home Screen
- Or choose Customize Home Screen to pick a different photo, color, or blurred background for the Home Screen
Tailor your Control Center
Control Center is the menu you open by swiping down from the top-right corner of your iPad. It gives you quick access to brightness, volume, Wi-Fi, Bluetooth, Airplane Mode, screen recording, and timers.
You can customize it, too. Add the controls you use, remove the ones you don’t, rearrange them, and resize supported controls. You can also add controls from supported third-party apps, like Gemini and Spotify.
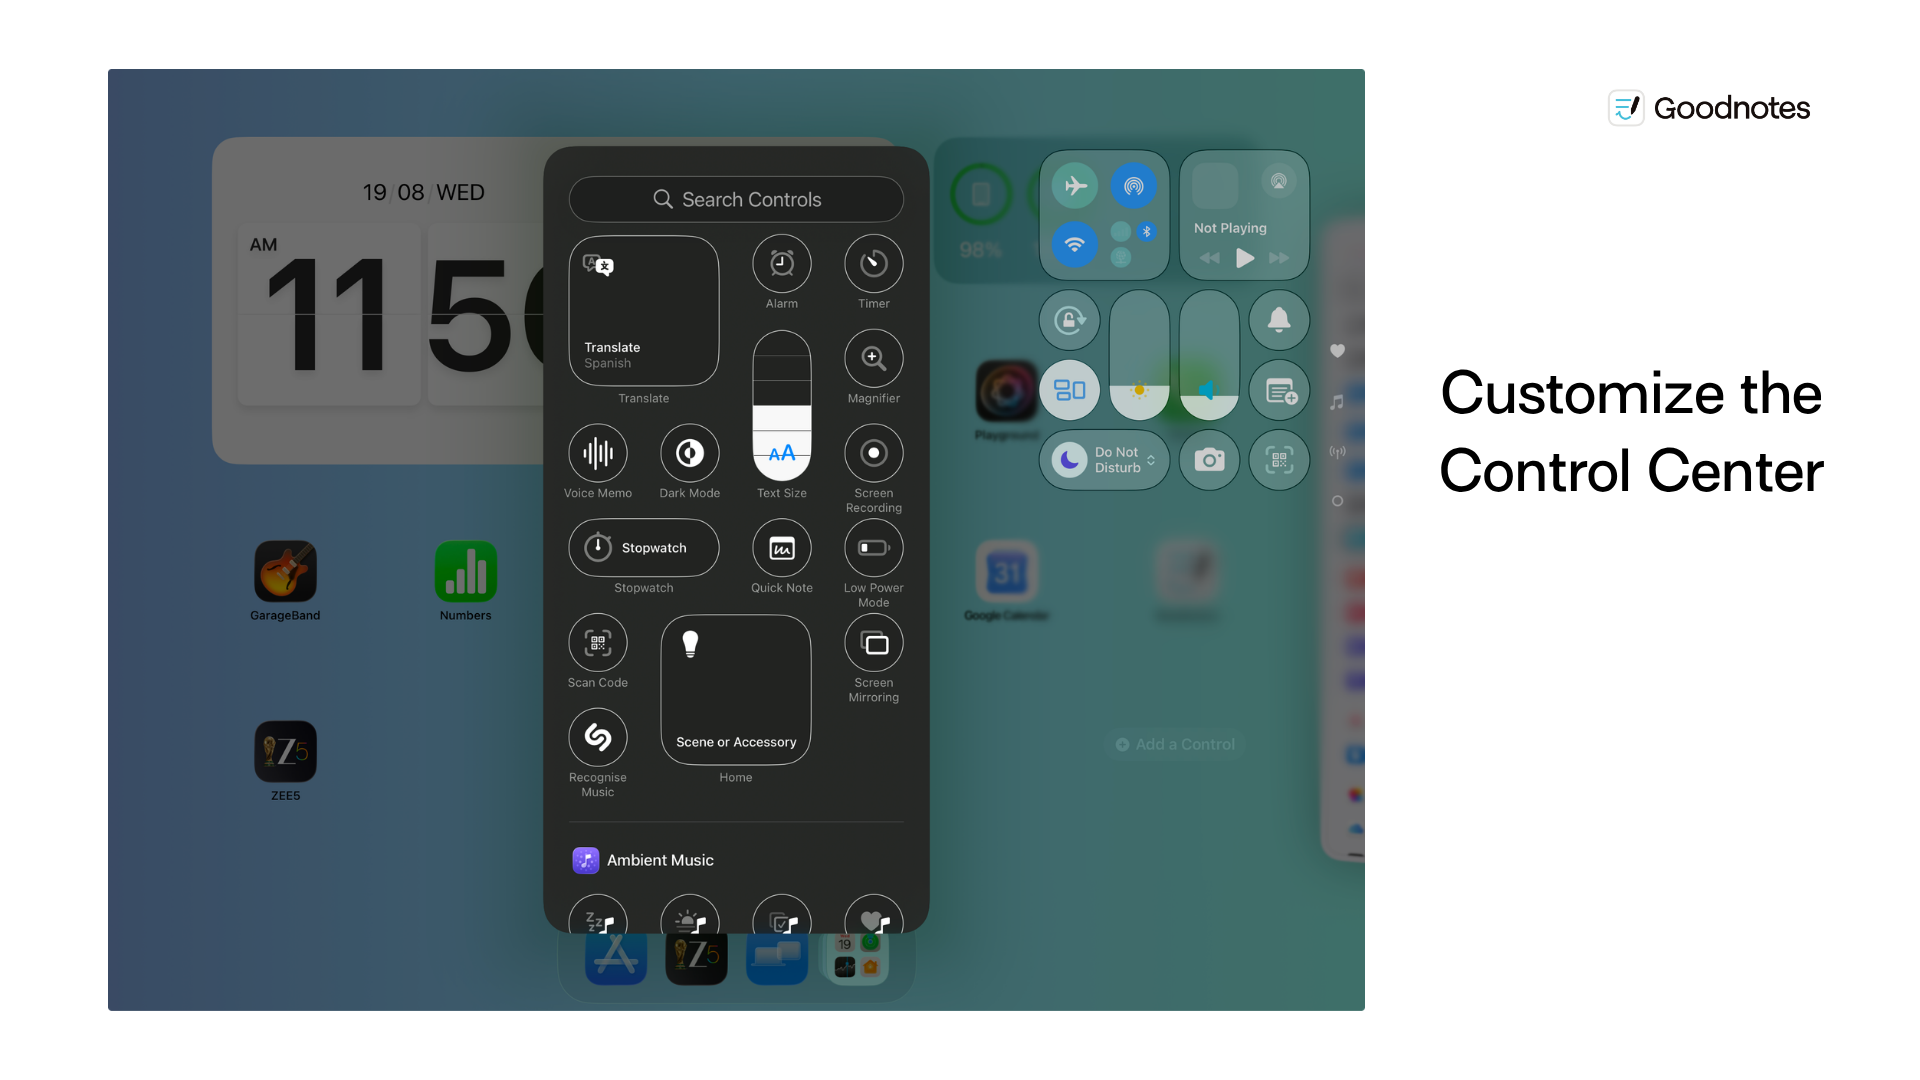
To tailor your Control Center
- Swipe down from the top-right corner of the screen
- Tap the Add/+ button in the top-left corner
- Tap Add a Control at the bottom of the panel
- Browse the controls and tap the ones you want to add
- Drag a control to move it somewhere more convenient
- Resize supported controls by dragging their handle
- Remove any control you don’t use by tapping its Remove/- button
Tweak your settings
While your iPad will work perfectly well with Apple’s default settings, you can adjust the display, review privacy permissions, and set up systems around how you like to work.
Here are a few settings you should check out:
- Adjust the display: Go to Settings > Display & Brightness to change the brightness, switch between Light and Dark Mode, and adjust other display options.
- Sort out your notifications: Go to Settings > Notifications, then open individual apps to decide which ones can send alerts and how those alerts appear. You probably don’t need every new app demanding your immediate attention.
- Choose how you multitask: If you’re on iPadOS 26, go to Settings > Multitasking & Gestures to choose how you want to work with multiple apps and windows.
- Review location access: Open Settings > Privacy & Security > Location Services to see which apps can access your location and change their permissions individually.
- Check Background App Refresh: Go to Settings > General > Background App Refresh to control whether apps can check for new content while you aren’t actively using them. You can turn it off entirely or choose whether it works over Wi-Fi or Wi-Fi and cellular data.
- Set up Focus modes. Head to Settings > Focus if you want different rules for work, study, downtime, or sleep. You can choose which people and apps are allowed to interrupt you while each Focus mode is active.
Add some helpful widgets
Widgets let you access useful information and shortcuts right on your Home Screen, so you don’t always have to open an app first to access what you need. You might add Weather to check the forecast, Calendar to see what’s coming up, or Batteries to keep an eye on connected accessories (like an Apple Watch or speaker).
You can also add widgets from your favorite apps. For example, Goodnotes has a QuickNote widget that opens a new note straight away, while YouTube offers widgets for quick access to YouTube search, Shorts, or your Subscriptions feed.
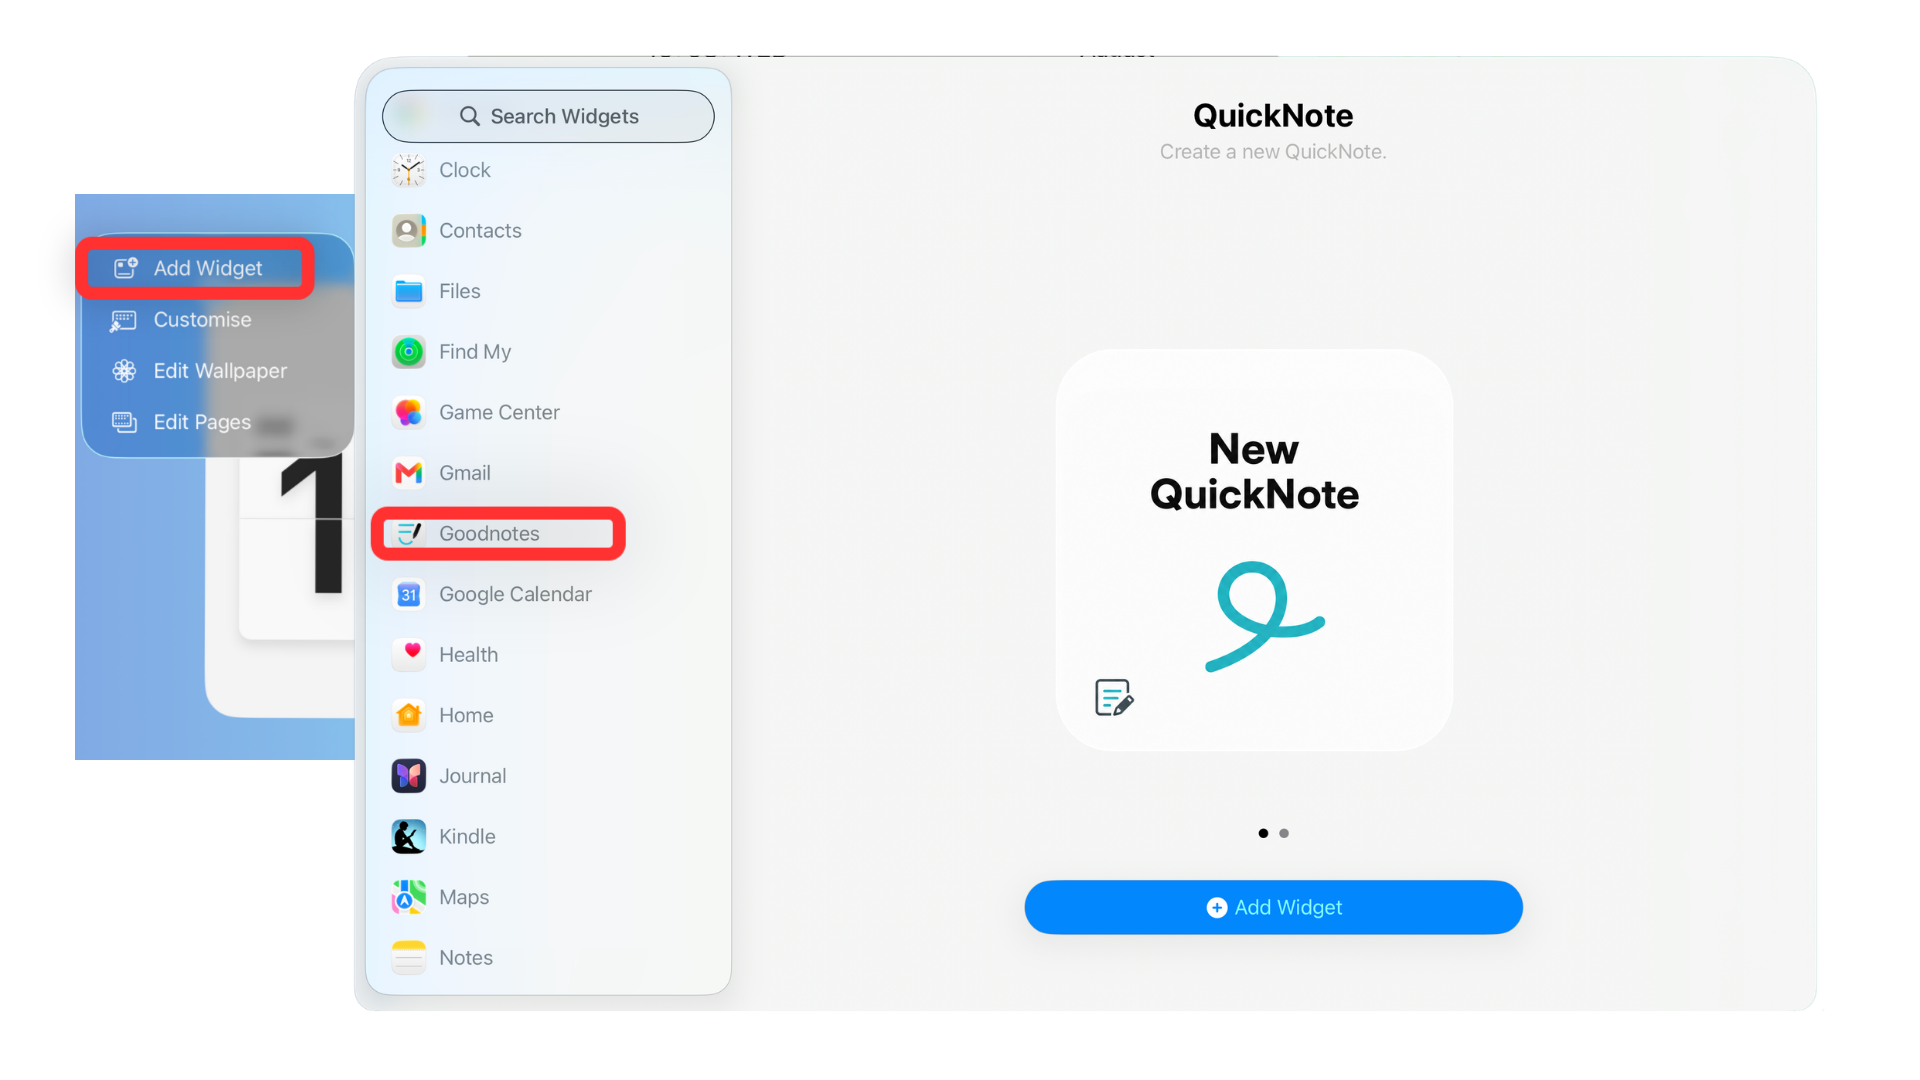
To add a widget:
- Touch and hold an empty area of the Home Screen until the apps start to jiggle
- Tap Edit at the top left of the screen
- Select Add Widget
- Search for an app or browse the available widgets
- Choose the widget and size you want
- Tap Add Widget
- Drag it wherever you want it on the Home Screen
- Tap Done when you’re finished
Create automations
Automations are actions your iPad can run for you through the Shortcuts app. For example, you can automatically turn on Low Power Mode when your battery gets low, switch on a Work or Study Focus at a set time, lower the screen brightness in the evening, or open a specific app when you connect a Bluetooth keyboard or headphones.
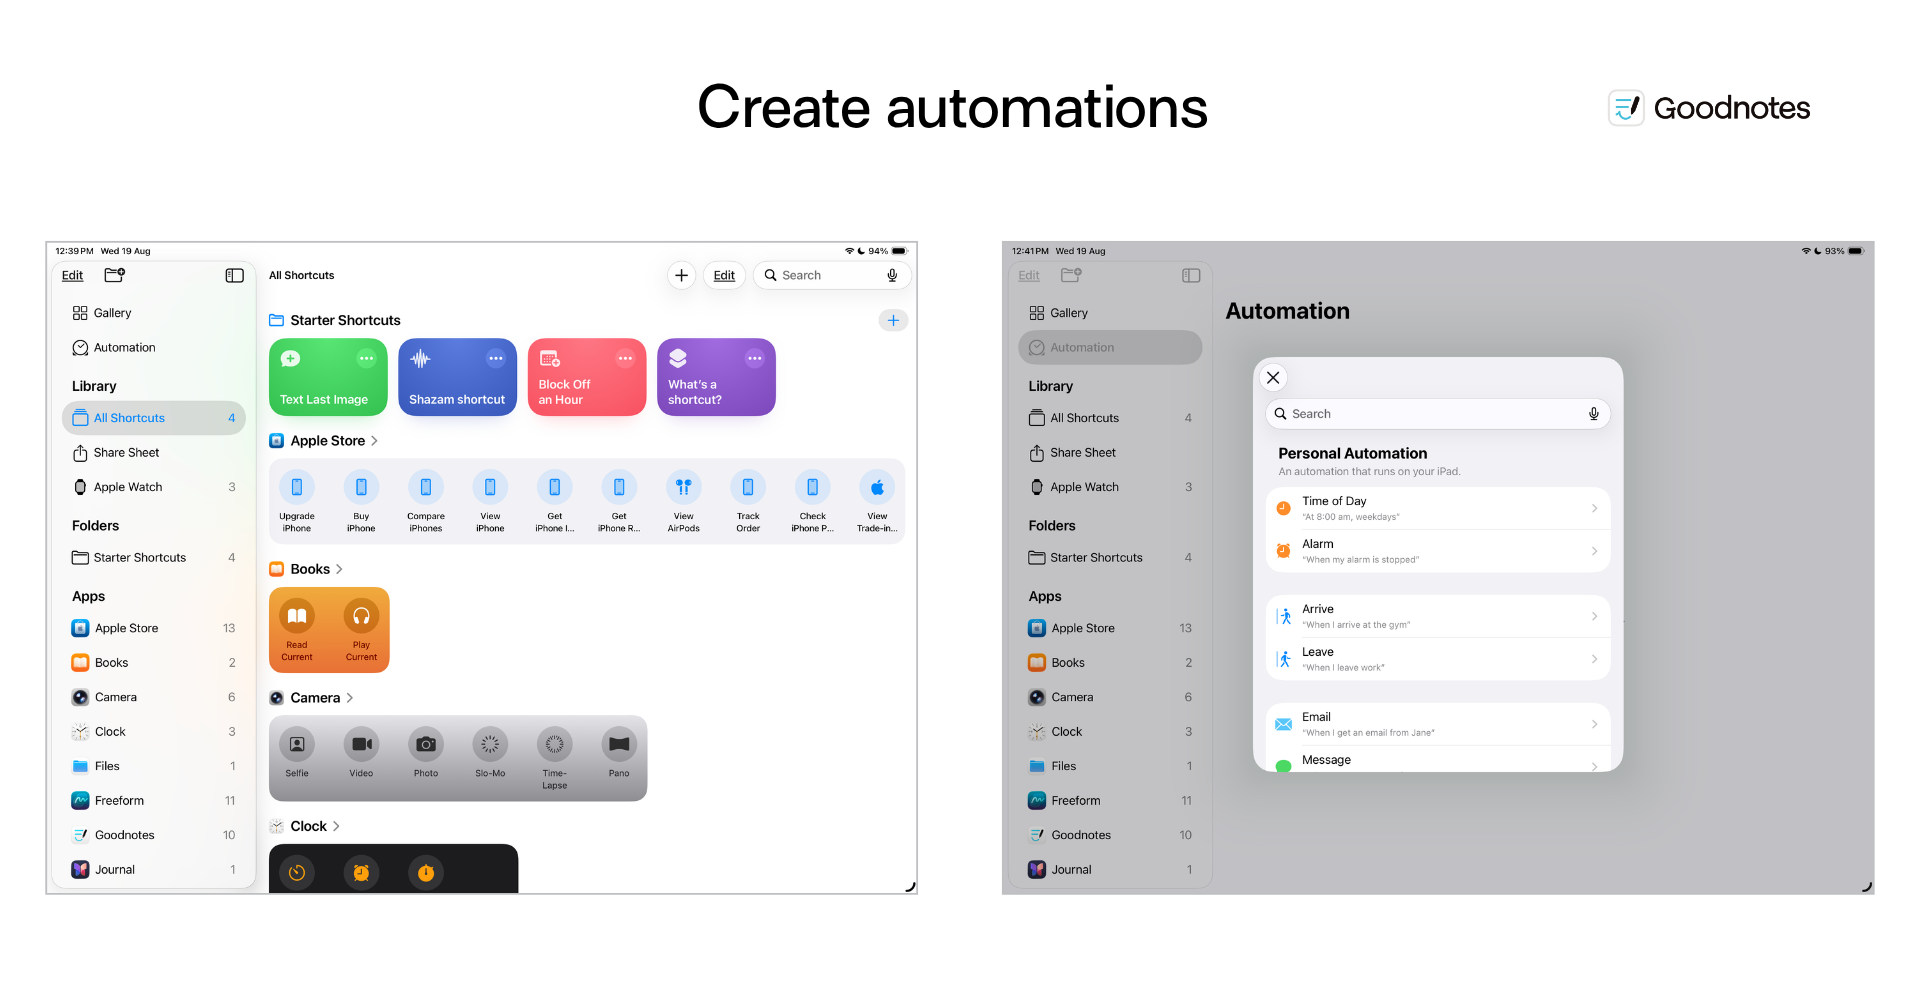
To create an automation:
- Open the Shortcuts app
- Tap Automation
- Tap Create Personal Automation (if you already have automations, tap the + button first)
- Choose what should trigger it, such as Time of Day, App, Bluetooth, or Battery Level
- Set the conditions for that trigger
- Tap Next, then Add Action
- Search for the action you want your iPad to perform
- Add any other actions you need
- Review the automation, then tap Done
And voilà! By this point, your iPad should be feeling a lot more yours. Now for the apps. We’ve picked a few versatile ones that can be useful whether you’re working, studying, creating, reading, or just making the most of your new iPad.
5 must-have apps for a new iPad
The apps you download will look different depending on whether your iPad is for work, study, or entertainment. So we’ve picked a few versatile apps that are worth considering for any new iPad—no matter how you plan to use it.
Goodnotes
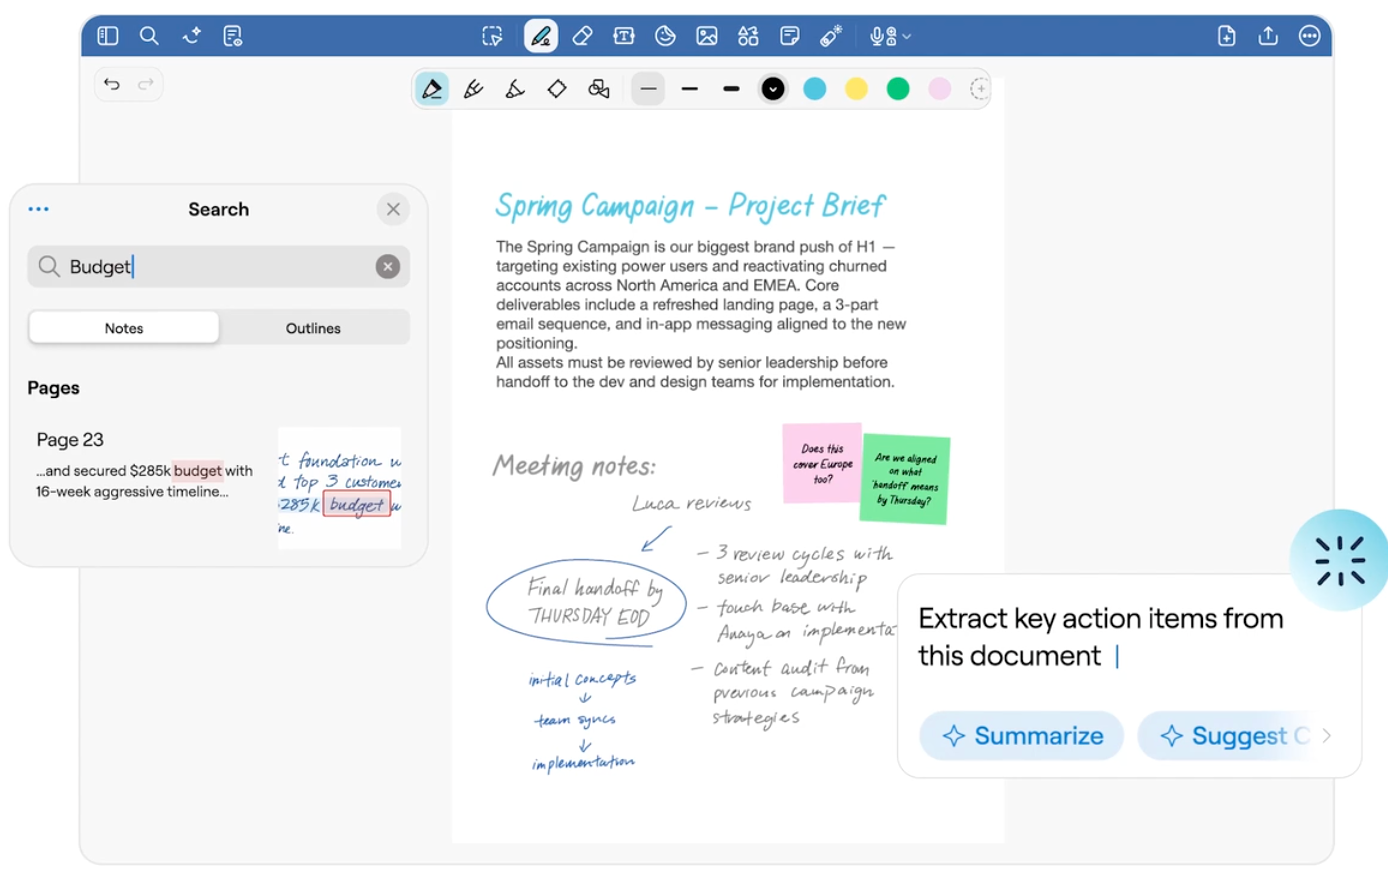
Goodnotes, Apple’s 2022 iPad App of the Year, feels right at home on any iPad. It’s a note-taking app that gives you a space to study, work, and play—whether you need to jot down a few phrases or keep track of multiple documents.
Open a Notebook to take handwritten notes, build a digital planner or scrapbook, sketch ideas, or mark up imported documents. Need more room? Whiteboards give you an infinite canvas for brainstorming, mind maps, diagrams, moodboards, and visual planning. And when you’d rather type, Text Documents are built for longer, structured writing.
It is built around a natural stylus handwriting experience, so you can write and sketch with your Apple Pencil, then move, resize, edit, or search your handwriting without losing that pen-on-paper feel. You can also annotate PDFs, which makes it useful for everything from lecture slides and readings to contracts and reports.
Then there’s Goodnotes AI, which lets you ask questions about your content, search across handwriting, typed text, PDFs, and images, and summarize notes and recordings. Goodnotes also works on Mac, Windows, and Android devices, and keeps your digital notes safe with automatic backups to Google Drive, Dropbox, and OneDrive, and iCloud sync across your Apple devices.
Price: Goodnotes has a free forever plan, and paid plans start at just $11.99 per year.
YouTube
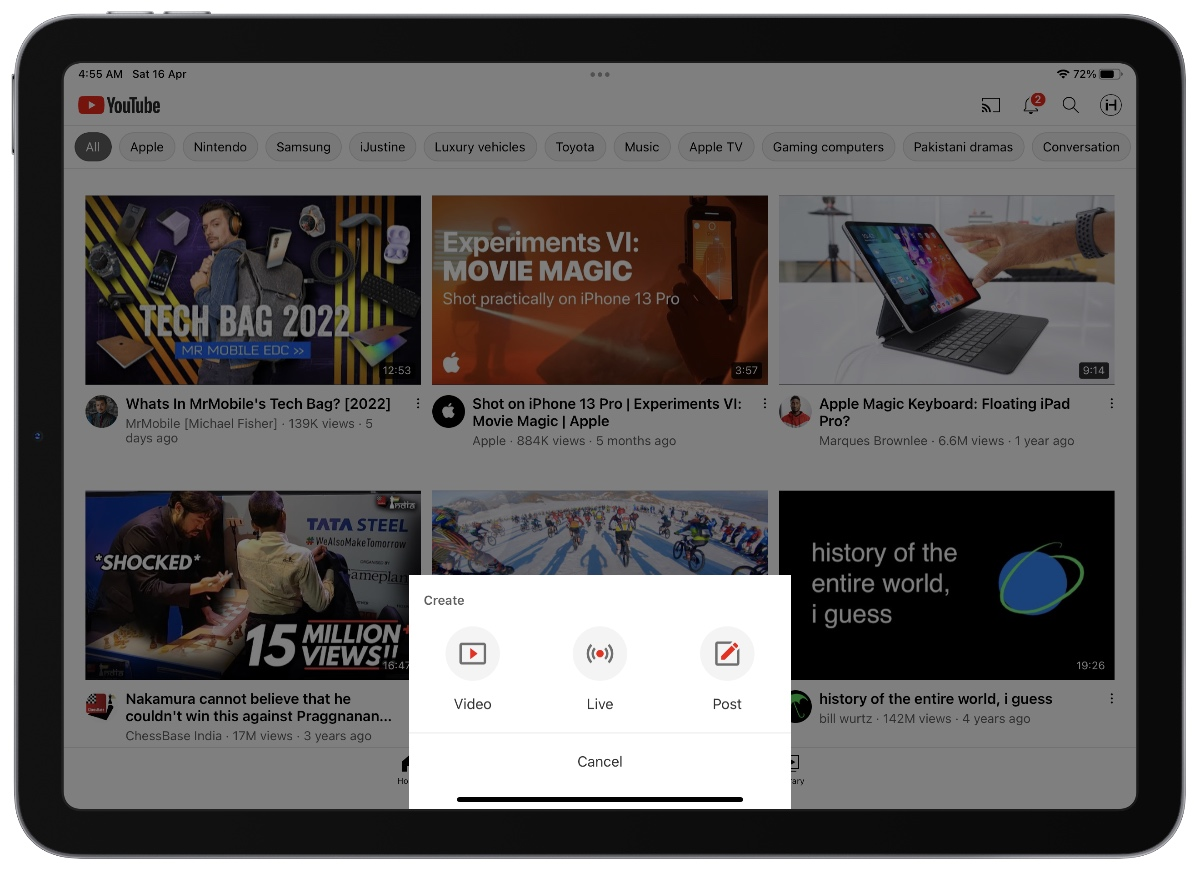
YouTube gives you access to videos across learning, entertainment, music, gaming, news, podcasts, and more. You can subscribe to channels you like, save videos to playlists or Watch Later, keep track of your viewing history, and create and share videos of your own.
On iPad, Picture-in-Picture lets you keep a video playing in a smaller window while you use another app. YouTube Premium also adds features like offline downloads and background play.
It’s a handy app to have downloaded not just for its entertainment value, but also because it’s the default online video-sharing and consumption platform. If you search ‘how to XYZ’, you’ll likely find your solution in the form of a YouTube video. Having the app downloaded means it’ll automatically open in the YouTube app, which provides a much better experience than YouTube in your browser.
Price: YouTube is free to use, while YouTube Premium starts at $15.99/month for an individual plan.
Procreate
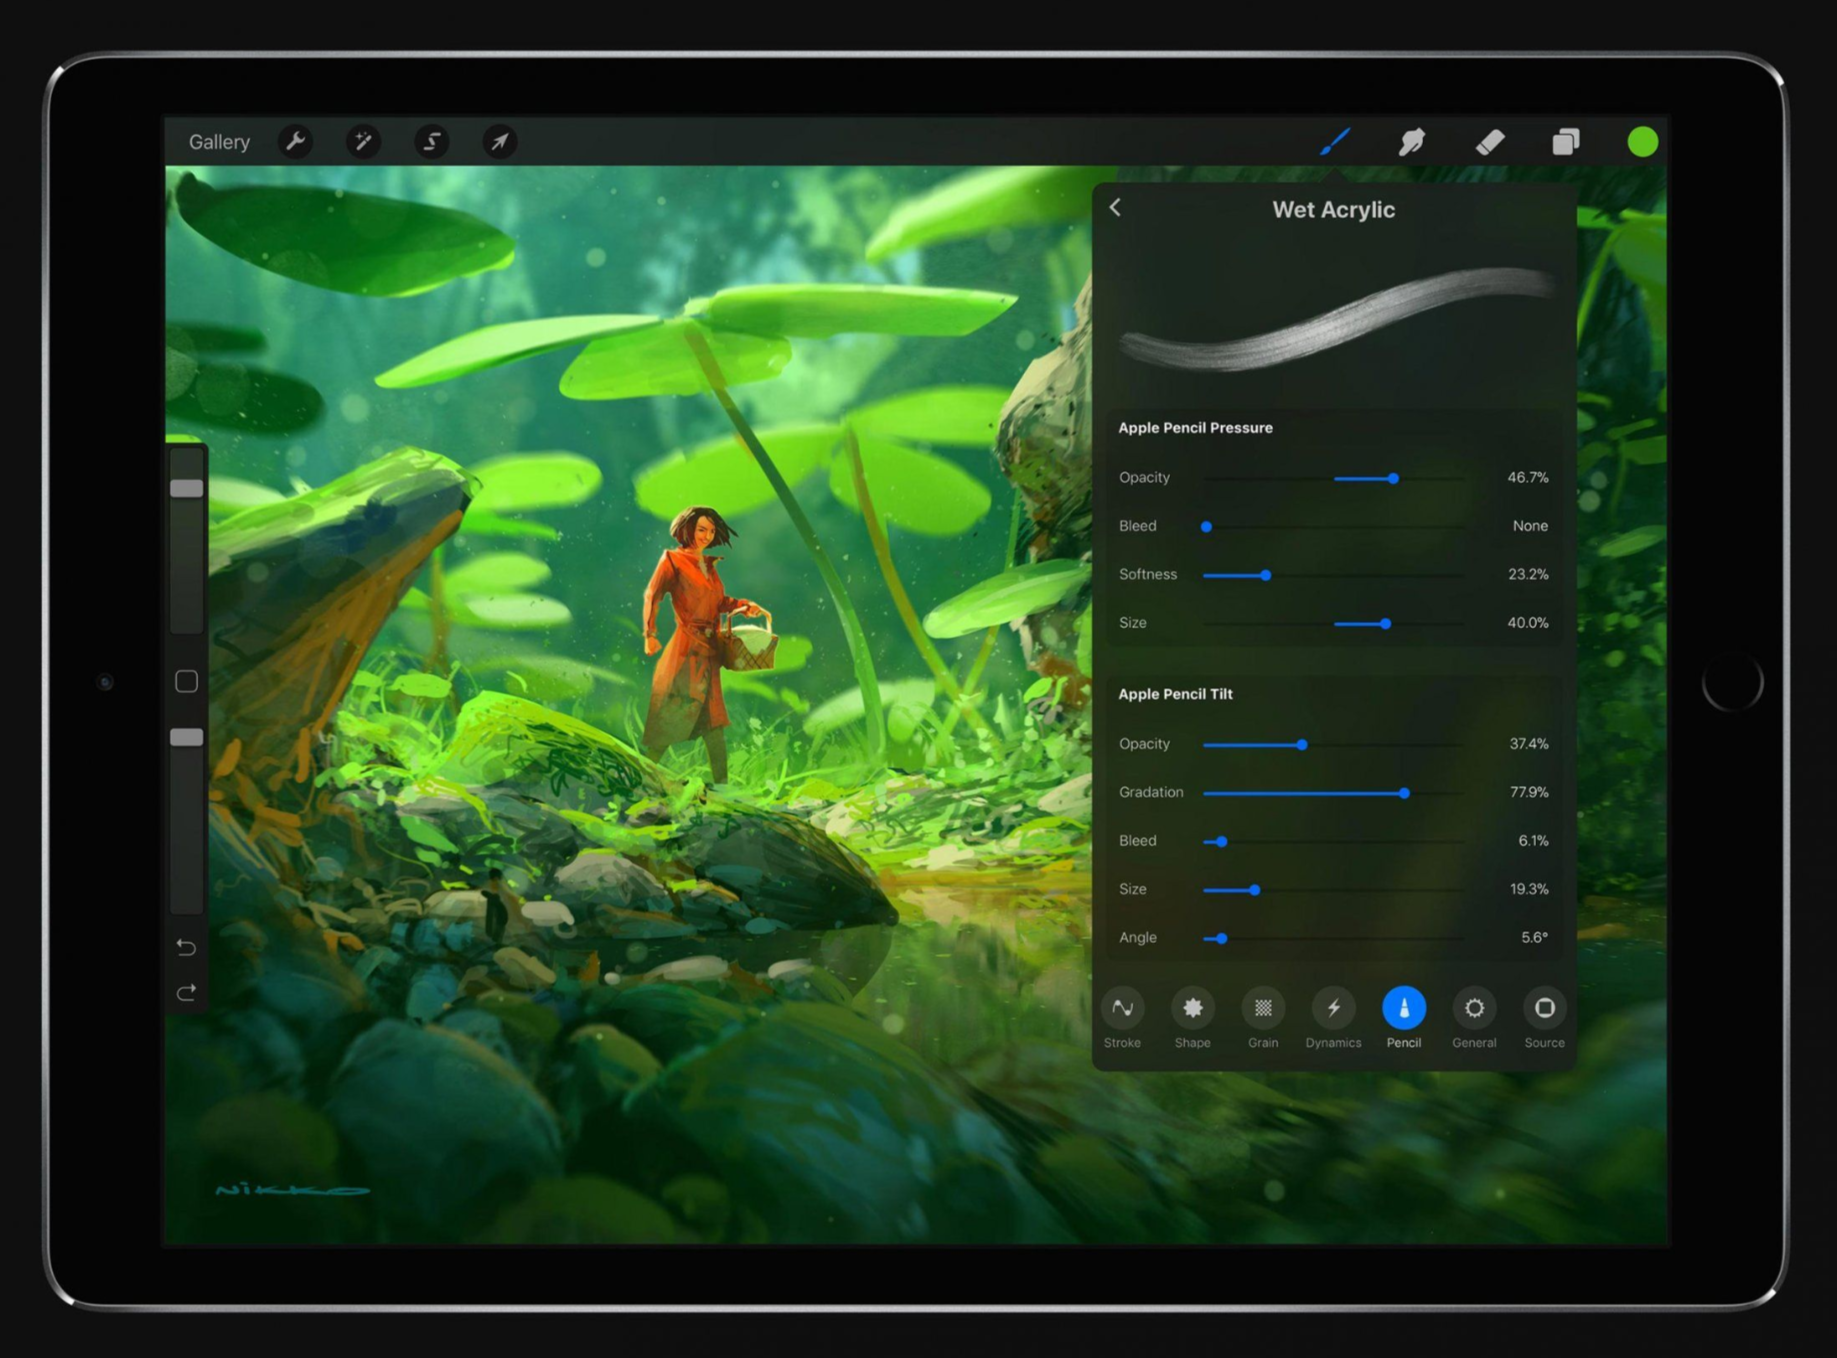
Procreate turns your iPad into a portable art studio. You can use it for sketching, painting, illustration, lettering, and animation, with hundreds of brushes, an advanced layer system, selection and transformation tools, effects, and features such as QuickShape and Drawing Assist.
Just like Goodnotes, it’s built specifically for iPad and works closely with Apple Pencil, including pressure-sensitive drawing and support for Apple Pencil Pro features such as squeeze and barrel roll.
Price: Procreate costs $12.99 as a one-time purchase, with no subscription.
Libby
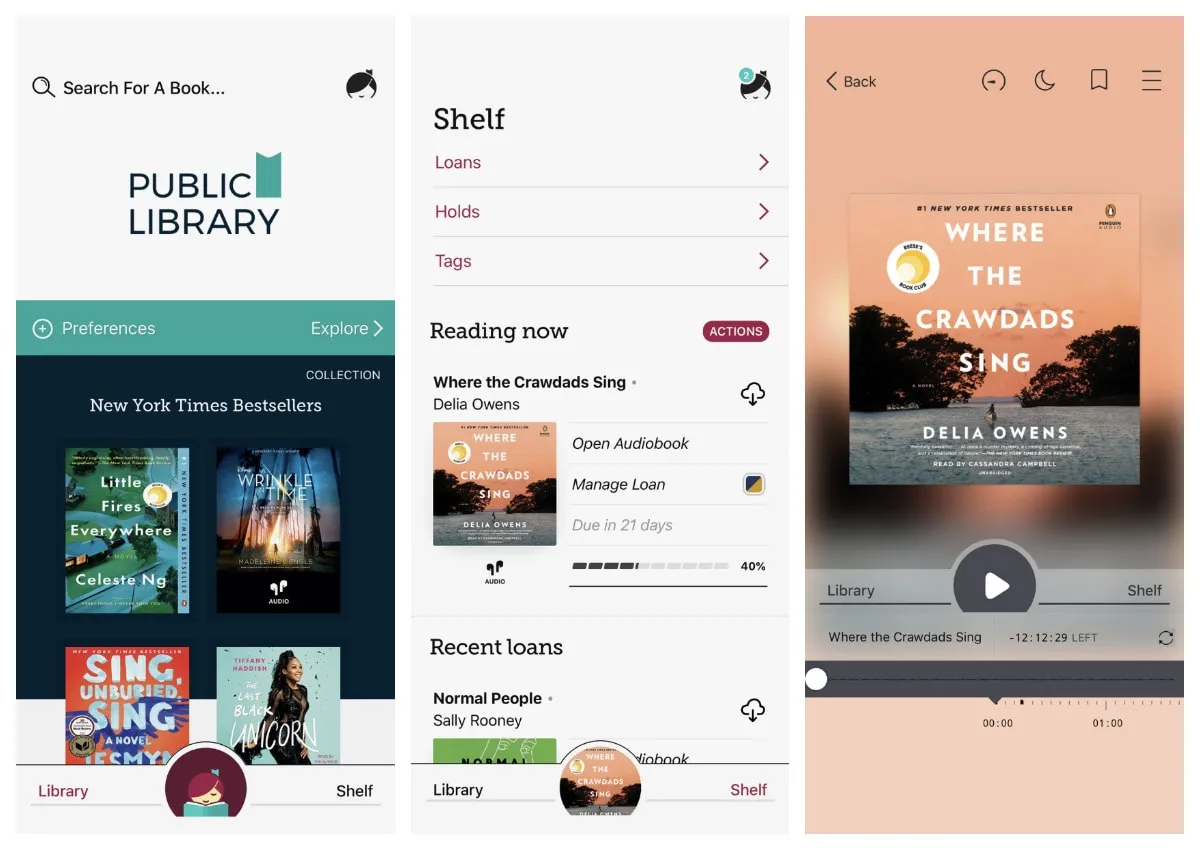
Libby brings your local library to your iPad. Add a valid library card, and you can borrow ebooks, audiobooks, magazines, and more directly in the app, without paying for each title or managing another subscription.
You can read or listen in the app, download titles for offline use, place holds on books that aren’t currently available, and renew eligible loans. Borrowed titles also return automatically at the end of the lending period, so there are no late fees to remember.
Price: Libby is free. You just need a library card from a participating library—which you can check on libby.com.
GeoGuessr
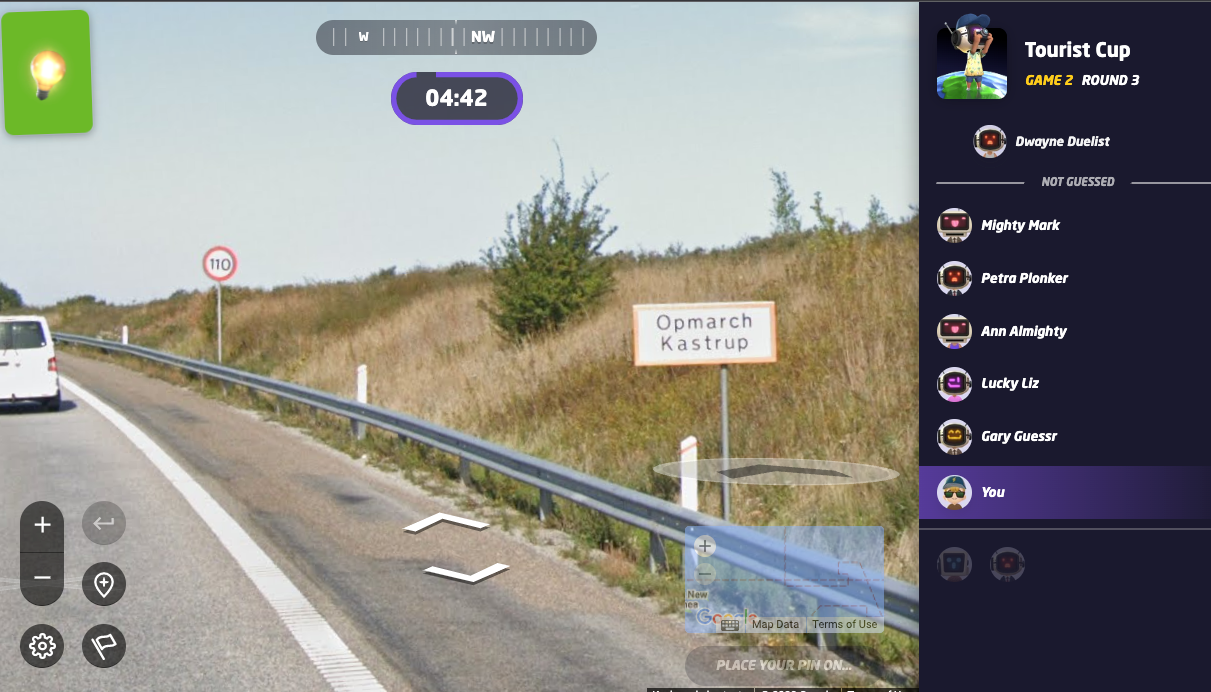
GeoGuessr drops you into a real-world street view location and tasks you with working out where you are using clues you can spot. Clues range from road signs and languages to landscapes, architecture, and occasionally one very unique-looking bollard.
You can play the Daily Challenge, explore maps from around the world, and track your scores. With a subscription, you can also unlock more maps and game modes, plus multiplayer options such as Duels and Battle Royale. It's a great daily app to play, is available in many languages, and includes time limits when you really want to test yourself.
Price: GeoGuessr is free to download and includes free daily gameplay. Paid subscriptions for GeoGuessr Pro Unlimited start at $6.99/month, with a discount for annual subscriptions ($47.88/year).
Top tips for making the most of your new iPad
Now that your iPad is set up, personalized, and has a few useful apps ready to go, here are some quick tips to help you get more out of your iPad.
Get the Apple Pencil (or other iPad stylus)
If you plan to take handwritten notes, annotate PDFs, draw, sketch, or mark up documents, a stylus is one of the most useful iPad accessories you can add. The Apple Pencil is designed specifically for iPad and offers low latency, precise input, and tilt sensitivity.
You’d ideally want the best iPad stylus for note-taking for the way you use your iPad. Apple’s current options include the Apple Pencil Pro and Apple Pencil (USB-C), while some older iPads support the first- or second-generation Apple Pencil. Third-party styluses are another option if you want something simpler or more affordable. Just check compatibility with your exact iPad model before buying, since stylus support varies between models.
Learn helpful iPad gestures
Apple has a useful guide to advanced iPad gestures, and a few are especially handy to learn early.
- Switch between open apps: Swipe left or right along the bottom edge of the screen to jump between apps you’ve recently used.
- Open the App Switcher: Swipe up from the bottom edge, pause in the middle of the screen, then lift your finger. You’ll see your open apps and can tap the one you want.
- Bring up the Dock inside an app: Swipe up an inch from the bottom edge and pause. This is useful when you want to open another app without returning to the Home Screen.
- Copy and paste with three fingers: Pinch inward with three fingers to copy selected text, pinch inward twice to cut it, and pinch outward with three fingers to paste.
- Open a Quick Note: Swipe up from the bottom-right corner with Apple Pencil. You can also enable the same corner gesture for your finger in Settings > Multitasking & Gestures.
- Take a screenshot with Apple Pencil: Swipe diagonally upward from either bottom corner with Apple Pencil to capture the screen and start marking it up straight away.
- Use two apps side by side: On iPadOS 26, you can drag another app from the Dock, App Library, or Spotlight to the left or right edge of the screen to place two windows next to each other.
Mastering these gestures will make your day-to-day use of the iPad that much easier.
Get a case and screen protector
A case protects the back and edges from everyday knocks and drops, while a screen protector gives the display an extra layer against scratches and scuffs.
For cases, you’ve got plenty of choice. Apple’s Smart Folio is thin, protects the front and back, and folds into different positions for writing, reading, or watching. OtterBox Defender is the heavier-duty option, with multiple protective layers designed for drops and everyday wear. And if you care as much about the case looking good as doing its job, CASETiFY has a much wider range of prints, collaborations, and customizable designs.
If you’ll be using Apple Pencil a lot, we’d also lean toward a matte or paper-feel screen protector. A matte protector adds more friction under the Pencil, which can make handwriting and drawing feel closer to working on paper. Just remember that the extra texture can slightly reduce the crispness of the display.
Split the keyboard for thumb typing
Typing with both thumbs is much easier when the keyboard isn’t stretched across the entire screen. Split Keyboard divides the onscreen keyboard into two halves, putting the keys closer to each edge so you can type with your thumbs while holding the iPad.
Split Keyboard is only available on iPad mini and iPad (9th generation and earlier), so you won’t see the option on newer iPad Air, iPad Pro, or standard iPad models.
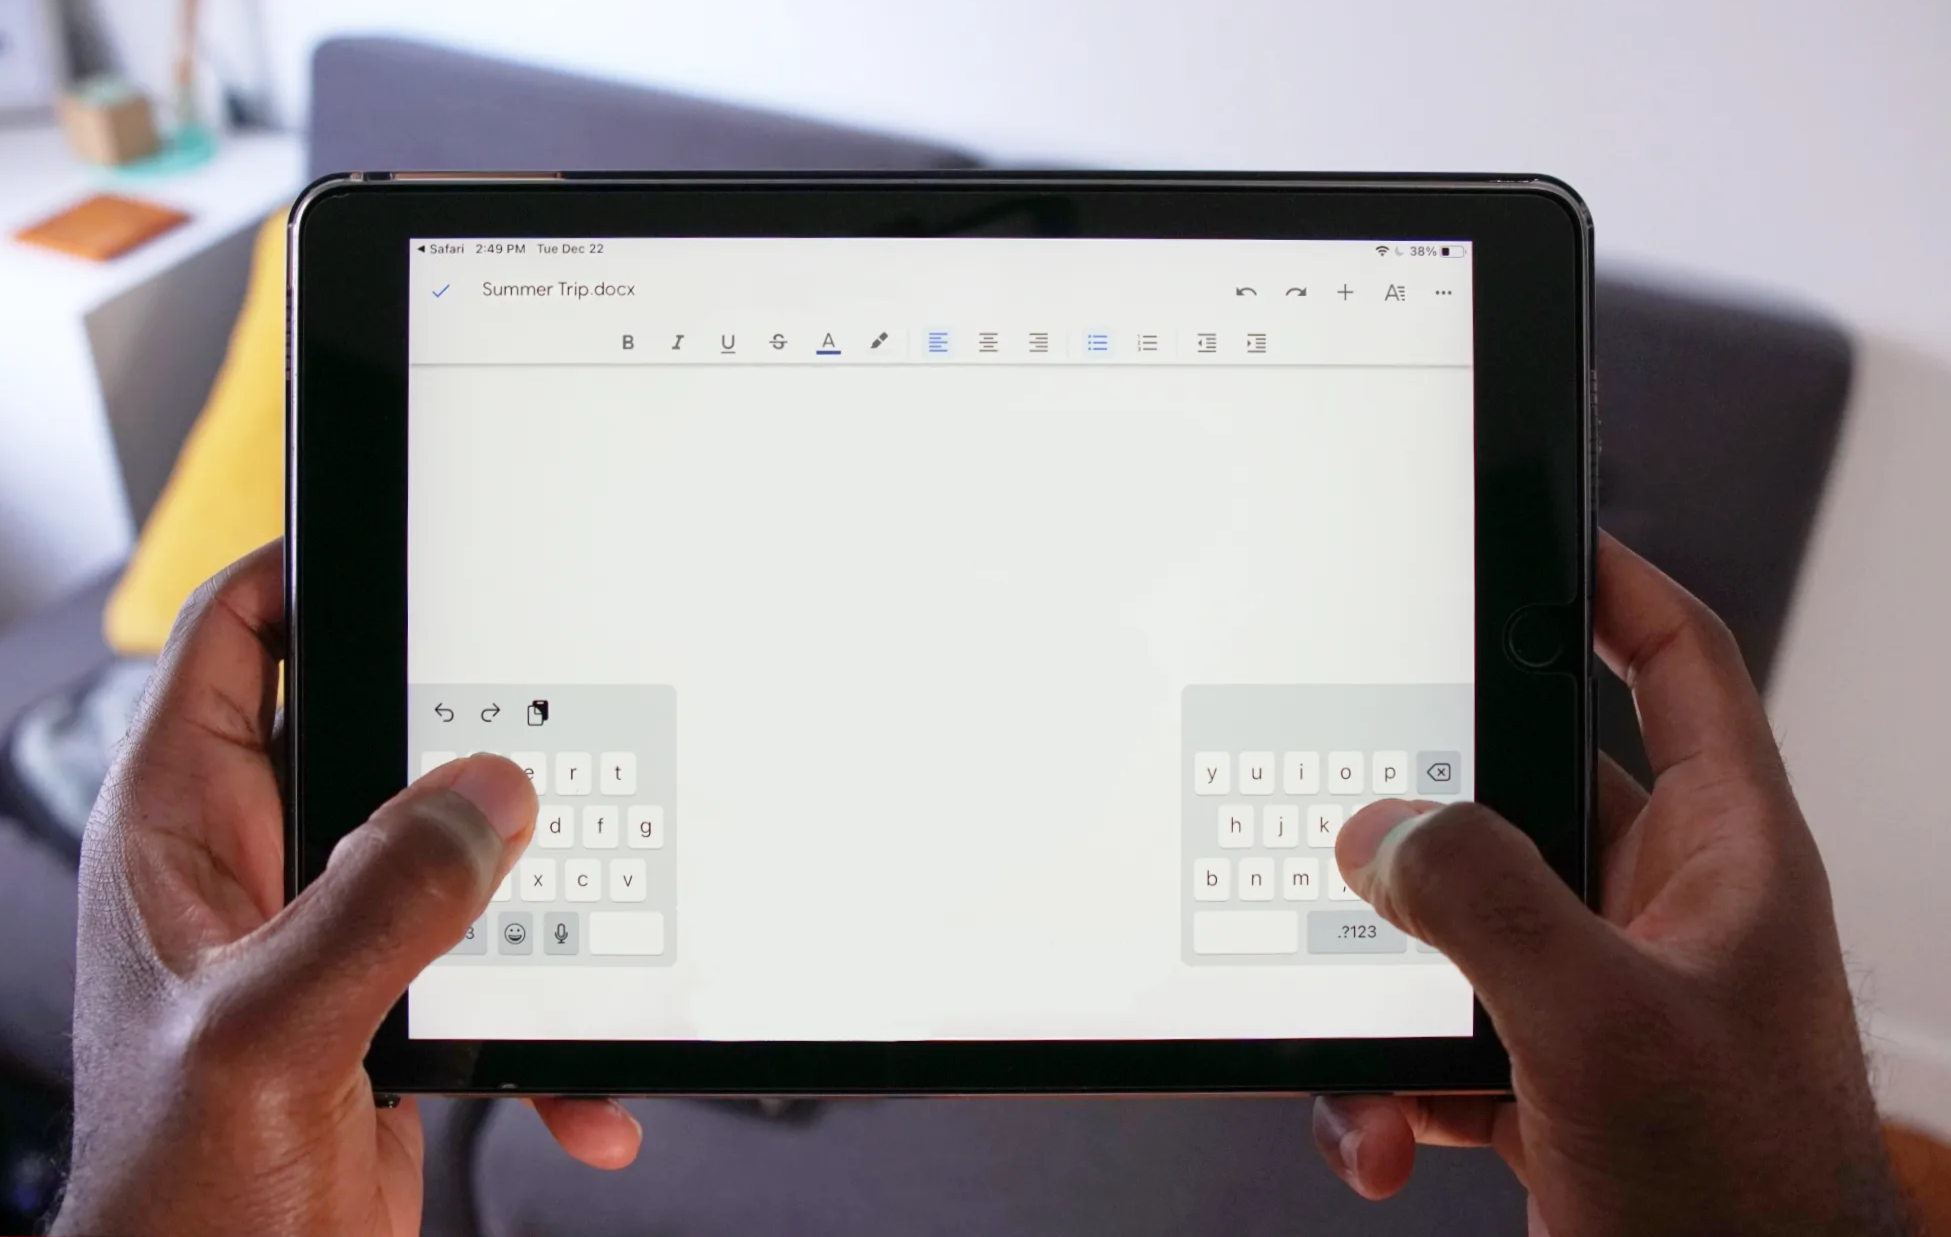
If your iPad supports it:
- Go to Settings > General > Keyboard and turn on Split Keyboard
- Open the onscreen keyboard in any app
- Touch and hold the Hide Keyboard button in the bottom-right corner
- Slide to Split, then release
- To go back, hold the same button and choose Merge
On other iPads, try the floating keyboard instead. It shrinks the keyboard into a smaller movable version that’s easier to type on with one hand.
Aim to keep the battery between 20% and 80%
To help your iPad battery stay healthy over time, try to keep it roughly between 20% and 80% when you can. You don’t need to panic if it drops below 20% or charge it to exactly 80% every time. The idea is simply to avoid leaving the battery completely drained or fully charged for long periods when you don’t need to
Newer iPads make the upper limit easy. On iPad Pro (M4) and later, iPad Air (M2) and later, iPad mini (A17 Pro), and iPad (A16), you can turn on 80% Limit. Your iPad will then stop charging at around 80%, which Apple says can help reduce battery wear, particularly if you charge frequently or leave your iPad plugged in for long periods.
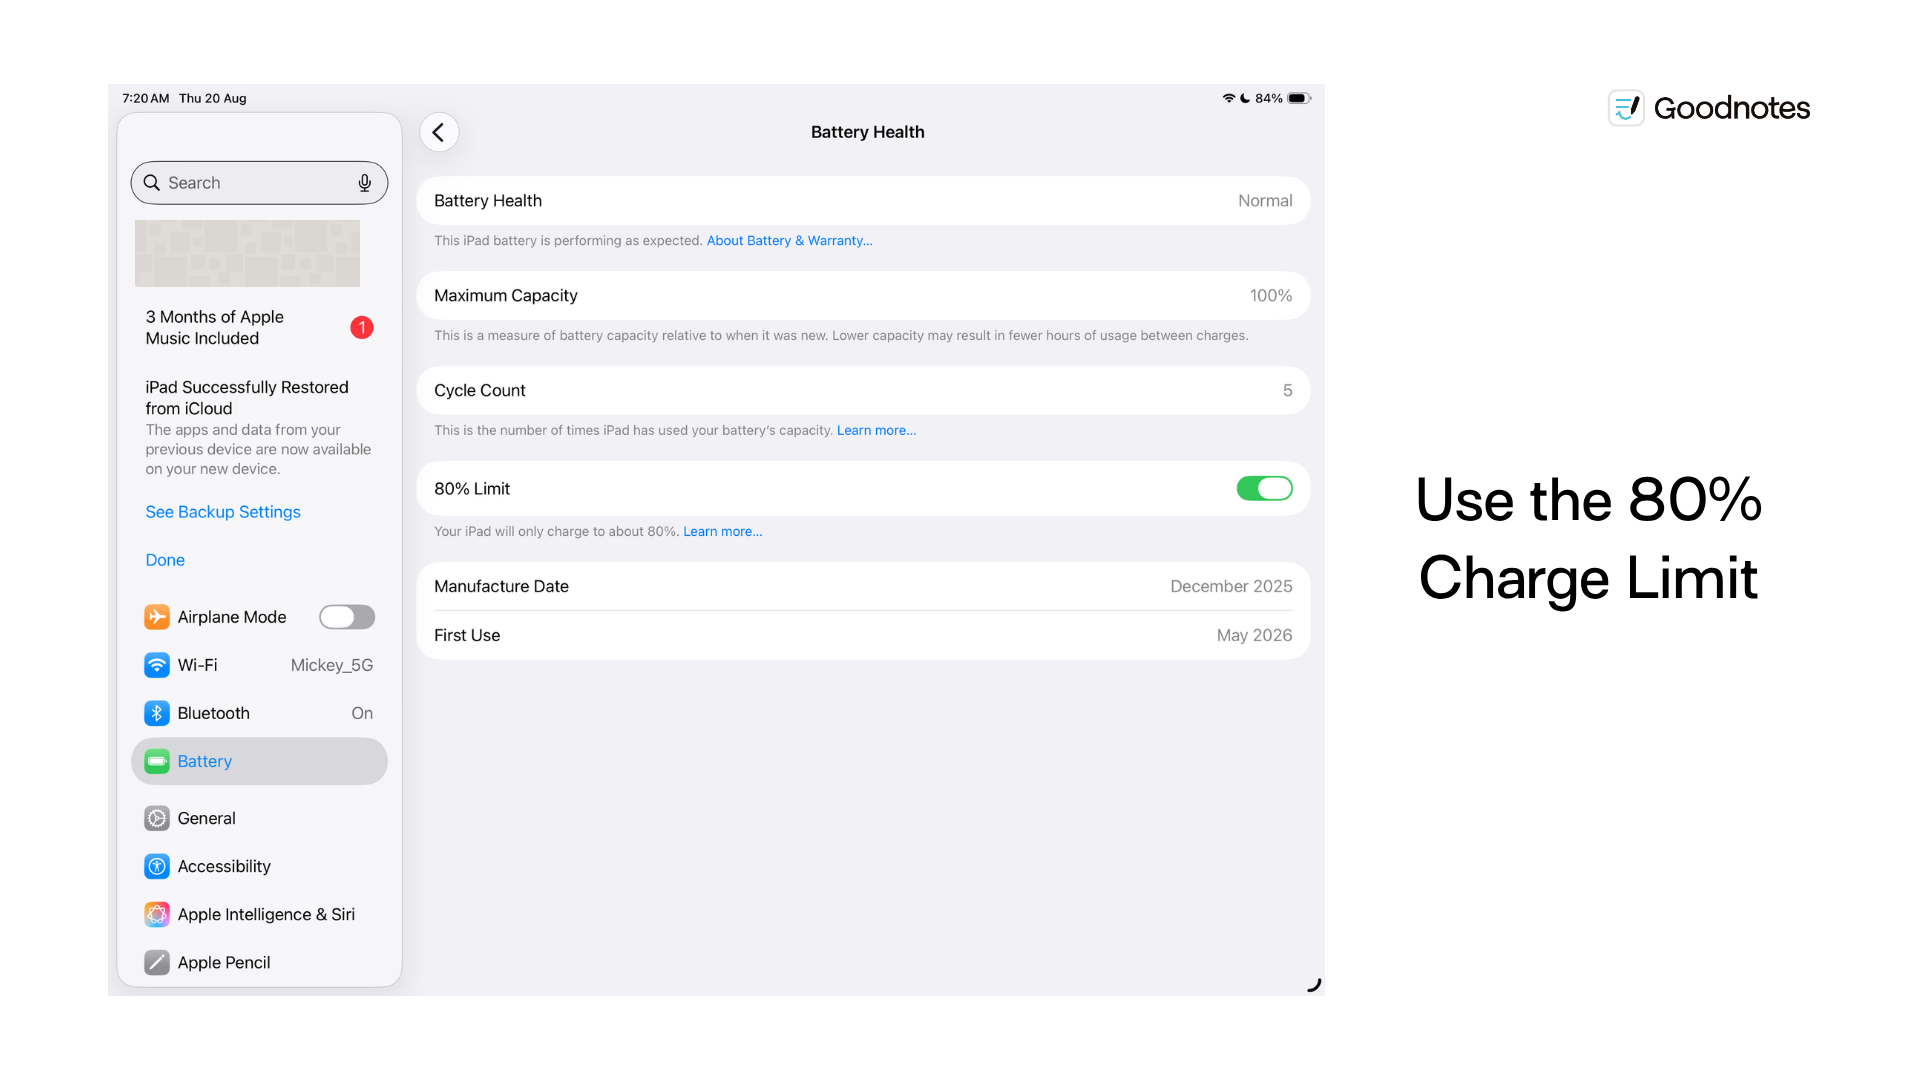
To turn it on:
- Go to Settings > Battery > Battery Health
- Turn on 80% Limit
- If you need a full battery for a long day, you can temporarily choose Charge to 100%
And you must keep your iPad cool. Apple warns that using or charging it when the ambient temperature is above 95°F (35°C) can permanently reduce battery lifespan.
You’re ready to get going with your new iPad
Your brand new iPad is set up, personalized, and ready to use. You’ve even got a couple of apps to start testing out. From here, you’ll gradually figure out which apps, widgets, shortcuts, and features deserve a permanent place on your device.
If note-taking, planning, handwriting, PDF annotation, or sketching is part of the plan, Goodnotes was built for the tablet and stylus experience. It gives you different ways to write, think, organize, and create, whether you’re using your iPad for work, study, or something in between.
Your iPad is ready to go. Now put it to work, play, or both. Enjoy.
Turn your iPad into your everyday notebook
Take handwritten notes, annotate PDFs, plan, sketch, brainstorm, and organize your ideas with Goodnotes, built for the iPad and stylus experience.
FAQs
How do I set up a new iPad without transferring data?
You can set up a brand new iPad without transferring any data from an old device. When you reach the Transfer Your Apps & Data screen, choose Don’t Transfer Apps & Data and continue setting up the iPad as a new device. You can still sign in with your Apple Account, or Apple ID, to use iCloud, download apps, and access previous purchases. If you change your mind later, you can erase the iPad and restore an iCloud backup or transfer data from a previous device.
Can I buy an iPad second-hand?
Yes! A second-hand iPad can be a good way to save money, but check that the previous owner has completely erased it and removed the Activation Lock before you pay. If you see an iPad Locked to Owner screen, or the old owner’s passcode or Apple Account is still required during setup, don’t buy it until they remove the device from their account. It’s also worth checking the physical condition, battery health, storage capacity, and whether the model still supports the iPadOS features you want.
What are the best apps for a new iPad?
The best apps for a new iPad depend on what you want to do with your tablet. For a versatile starting lineup, we’d suggest Goodnotes for handwriting, notes, planning, PDF annotation, Whiteboards, Text Documents, and AI support. YouTube is great for videos and tutorials, Procreate for drawing and illustration, Libby for library ebooks and audiobooks, and GeoGuessr for a little educational fun.
You don’t need to download everything on day one. Start with the apps that match your interests and iPad use cases, then add others as you figure out what deserves a spot among those Home Screen icons.